Saturday, 14 February 2015

4Ground Stoic Arms day 1...

So as I mentioned earlier I got the Stoic Arms from 4Ground, when the package arrived 2 thoughts instantly ran through my head: 1, this is gonna be awesome, and 2, this is gonna be royal pain.


As Fred is demonstrating the box it comes in is massive! It's also really heavy, I must admit I was a bit put off when I ordered it that it was excluded from the spend £40 get free shipping offer, but now I can see why.

So I got off to a really good start when I couldn't open the box! For some reason I got it into my head that it was a flip open box. I cut along the sides and the front and then spent a lot longer than I should have trying to flip it open. So after sometime proving people right that I shouldn't be allowed out on my own I cut along the back, and what do you know, it opened!

So what's in the box?
14 pages!!! of coloured A4 instructions, no writing just lots and lots of pictures. It would be helpful here and there to have a bit of written explanation, but if can follow them I'm sure all of you who have no issues with opening boxes will be fine. The pegs and elastics bands are a really nice addition, as we don't have them old style pegs and I can't find the big box of bands we have somewhere... 
You also get 2 big bags full of laser cut wood.     
 

So PVA at the ready I opened the 1st bag. It really is a simple case of look at the instructions and pop out the parts, which come out really easily and cleanly, a quick dry fit and start gluing. As I mentioned in my last blog PVA takes a while to dry, which can be a little frustrating but wasn't ready to break out the superglue. This where the bands and pegs come in handy, they do great job of holding it all tight together while you can carry on and do the next bit.

 So far so good, I was going to use the Lego you can see in the back ground to hold things straight while the glue dried. As I found out you really don't need to, the building is wonky! so trying to keep it  straight really doesn't help! And the bits fit together so well they don't need holding. 
 

You build up the inside and then glue it to base that holds the frame. The trick I have found here is use glue sparingly, I put bit more on the base and spread it out making sure the edges were covered, then I put a little bit on each top part of the frame and on the larger bits in the middle and pushed the inside in. The pegs do their thing and hold it while it dries, again the fit was perfect, just give it time to dry.
 

The doors open and close, but you have to be really careful taking frame (part DR1) out of the sheet as the top is really thin. The way you put the door in is a bit of a sod, you have to glue the bottom frame down put the door in at an angle, glue the top frame and hold it on top of the door and push it in place. When it works, it works really well, but one of the frames was such a tight fit at the top it snapped as I was pushing it in. The way around this was to glue half the frame in and then put the other half in with the door.
Onward and upwards, the stairs are made out of 11 separate parts that go together really easily and the tightness of the fit holds it together while you put the steps in. Yes they are meant to be wonky.

Being an Inn it has a bar, which is nicely detailed with units and shelves, it even has a shelf under the bar!


I managed to get the double doors to open and close, sorry for the inconsistency with photos as I was using my phone and it could not make up its mind if it wanted flash or not (plus I should really check the photos at the time), but when its done I'll get some proper lights on it and take some good pictures.


Next up is the kitchen complete with fire and oven. Its the basic build the inside, then build the frame and glue them together, use the pegs to hold it and it's all good. Again the perfect fit makes it go together easily. So far this nowhere near as bad as I thought it was going to be.
 
The pictures show how you get colour in between the frames, each coloured section is on a thin bit wood that you pop out and glue in place, simple but somewhat time consuming. But you get into a rhythm, push, clean (if needed, which in most cases it was not), glue, insert and repeat. 


The lean too supports are 2 halves that need to be glued together and pegged while they dry. The instructions show you to do this first and then glue it to the base and add the roof, this where I got a bit clever. I glued it all in place and then pegged it, I done it this way to ensure the supports were straight and it all fitted. It worked so I'll take that as a win.

So left on the ground floor I have some free standing stairs and a small roof for the kitchen. I would have liked to have finished it (the ground floor, not the whole thing!) but its really not fun anymore, so best leave it for now. But all in all I feel its a great start to what is so far a great kit. 


That's it for now, more to follow, I can see it taking 3 or 4 days in all, but we shall see.

Thanks for stopping by and hope to see you again soon. 


Tuesday, 10 February 2015

Skorne starter set (with a difference)

So after many many years I have finally finished my Skorne starter set! And by many years I mean it came with the MkI cards and I got it at Salute (well, I think it was Salute but I could be wrong) the first year they were available! So as you can tell they have been sitting around for some time.


I have only used these once which can be found here I didn't use Morghoul as I had the Naaresh figure and thought I'd go with him, but I have decided if/when I play these I will stick with Morghoul.
Used with kind permission of Riot 
So as you can see from the picture most of them were complete, it was just the Brute that needed finishing.

So here he is:
 

This guy is a must for Morghoul, because a knocked Morghoul is dead Morghoul! His Animus is Safeguard, which means no knockdown and reduced slam distance.

Morghoul in all his low armoured glory!


The only thing I dont like about this model is the gloves, we are beyond Edward Scissorhands and are in the Morghoul Garden Shearshands region.

The Gladiator...


What a beast! The only problem with his almighty slam is that you cam slam and follow up out of Morghouls control area, so you can't force for more attacks.

The Cyclops Savage.
 

Nice all round light, can dish out some damage, and the fact that can boost after rolling means you should always get the best out of him.

So far I'm doing well on the painting front, but I still have 13 Goblins to paint for the 19th...

I mentioned in my last blog about the Stotic Arms from 4Ground, well I just got the confirmation E-mail that its been sent, so stay tuned for massive Inn action...

Thanks for stopping by and hope to see you again soon.


Sunday, 8 February 2015

Troll Slayer and 4Grounds Fabled Realms

So after seeing Riots Troll Slayer which can be found here, I had to do one! I went to the shed and found the one I knew I had. I also found some other great things, but I'll save them for another blog.

So here he is:
 

I have to admit that I really enjoyed painting him, I had a few issues though, mainly was I used the purple wash from Secret Weapon and it came out glossy, a few coats of matt vanish and it became bearable. This was not the issue though, it was the colour, I painted the flesh and trousers first and it just wasn't working, but I carried on and the beard made it work so I left it. I was going to change them to the traditional blue and white strips that can be seen on the front cover on the 1st Fantasy Role Play book, which if I do another one will be what I go with.

It also highlighted that I'm not very good with clean metal, at one point it nearly got stripped after the first layer of silver on the axe, but I just carried on and cleaned it up a bit and covered the messy bit in blood, sorted!

I'm pleased with the way he came out, but still need to base him...

I also have no use for this fellow as I don't play Dwarfs and have intention of starting now, I don't role play so can't use him there, so this leaves the question what do I do with him? The answer is, his the founding member of the M&M team! What is the M&M team? Misfits and Miscreants Team! Its a group of models I have no use of but really want to paint. I will also paint these models when I'm fed up with painting the stuff I have to paint, a change is as good as a rest a they say.  I have few models knocking about that will fit nicely into the team, next up is a Dark Elf Shade, the ultimate traveling companion of a Dwarf! New members of the M&M Team will appear as and when, so no promises as to when they will be on here.

I have not done anymore of the Maggoth Lord, but will try and do more soonish...

I went to Dark Sphere the other day and came away with this:


This is the Fabled Realms Mordanburg Highstreet House 01 from 4Ground and its awesome! It went together really quickly and easily. The PVA drying time was the only thing that really slowed it down. It comes pre cut and pre coloured, it is as simple as gluing it together. I was a bit on the fence about these to start with, was not convinced they would go together like it says on the packet. But now I will happily get a few more and make up a small town. If I ever have a spare £125.00 this will be the centre piece!


  As Fleeing Fred is demonstrating it's the perfect size of Warhammer Fantasy and also goes really nicely with Warmachine.
As you can see from above the inside is detailed and the roof and floors separate and the doors open and close so you can get inside them, which is great for you role players.

I can't recommend these enough, they are simply great!


So to the list of painted models I can add the founding member of the M&M team and a Skorne Brute light warbeast (coming soon to a blog near you).

Thanks for stopping by and hope to see you again soon...

Tuesday, 3 February 2015

Speed painting Khador

Ages ago I got the Warmachine Starter Box, which has Menoth and Khador forces in. I have painted and used the Menoth force a few times but the Khador got glued together and shoved to the back of the cupboard.

Well I decided it was time that changed. So over the last 2 evenings I have done this.
Its the starter set plus the wardog. I got the wardog because the Menoth set that comes in the starter box is 1 point more than the Khador force, and when you have a point left over for Khador the wardog is the miniature you want.


I did paint him ages ago which is why the red does not match with rest (plus some of paint has chipped off, which I'm classing as battle damage).


Kommander Sorscha is the Warcaster in the starter set, I did write about her in a previous blog when there was a Journeyman League starting at the old club, shame it didn't go anywhere. She's a pretty solid caster with an amazing assassination run from a long way away.

The Destroyer and Juggernaut are the two Heavy Warjacks I also wrote about in the previous blog.
Both pretty good Jacks, but Khador have much better ones which I'll get to later.


 Man-O-War Shocktroopers are big and 'ard! With naturally high armour and the ability to shield wall as an order with 8 damage boxes each they can take some shifting! They have a good strength melee attack and a powerful yet short range attack. On the downside they are slow!

So that's what I have painted so far, on the bench I have Kommandant Irusk, a Koldun Lord and a Manhunter.

If I do take these any further, which I really want to do, I have a few ideas...

Warcaster: Sorscha and Irusk are good, but you cannot overlook the Butcher!
Warjacks: I have always loved the Spriggan, 2 ranged attacks, 2 melee attacks and a few special rules make this a great choice. If you take Irusk's tier list they are a point cheaper which you cannot argue with. Plus it has a really cool name!
The Devastator is another awesome jack, all I need say is armour 25!!! I know it drops when you attack but that is a lot of armour. Its 'rain of death' attack can also be a game winner. It too is 1 point cheaper in Irusk's tier list.
So with the tier points decrease and Irusk's 6 warjack points that's these 2 monsters for 11 points!
Units: Don't think I need to write about the Winter Guard death star, but its on the list. Iron Fang are an amazing unit, with the officer attachment and Iron Fang Kovnik nearby they last a while and really dish out some punishment, they are a maybe as I really like the Assault Kommandos. With a choice of 2 range attacks and 2 melee attacks, they are not bad. Add to that they ignore cloud effects, have the assault and battery and shield wall orders at 8 points for 10 they work for me. The attachment I'm not too sure about, it will take some testing to see if I can work out how to use him. But he does have a flame thrower!
Solos: Kovnik Jozef Grigorovich is an auto include if you have the Winter Guard, he just does so much for them.
The Man-O-War Drakhun is solid, high armour, loads of hit boxes and hits really hard. But he only has 1 attack on the charge, but it hurts!

So a few things to think about, but I am leaning towards Irusk and his tier list, even its just tier one for the reduction on the jacks...

So to add to the models painted this year I can add: Sorscha, Destroyer and Juggernaut warjacks, 5 Man-O-War Shocktroopers and a wardog (Well I only finished the base, but its still finished).

I know I should be painting Goblins for the 19th, but just can't bring myself to do them at the moment, but I will...


That's it for now, as always, thanks for stopping by and hope to see you again soon.  

Thursday, 29 January 2015

Fleeing Fred

Meet Fleeing Fred...

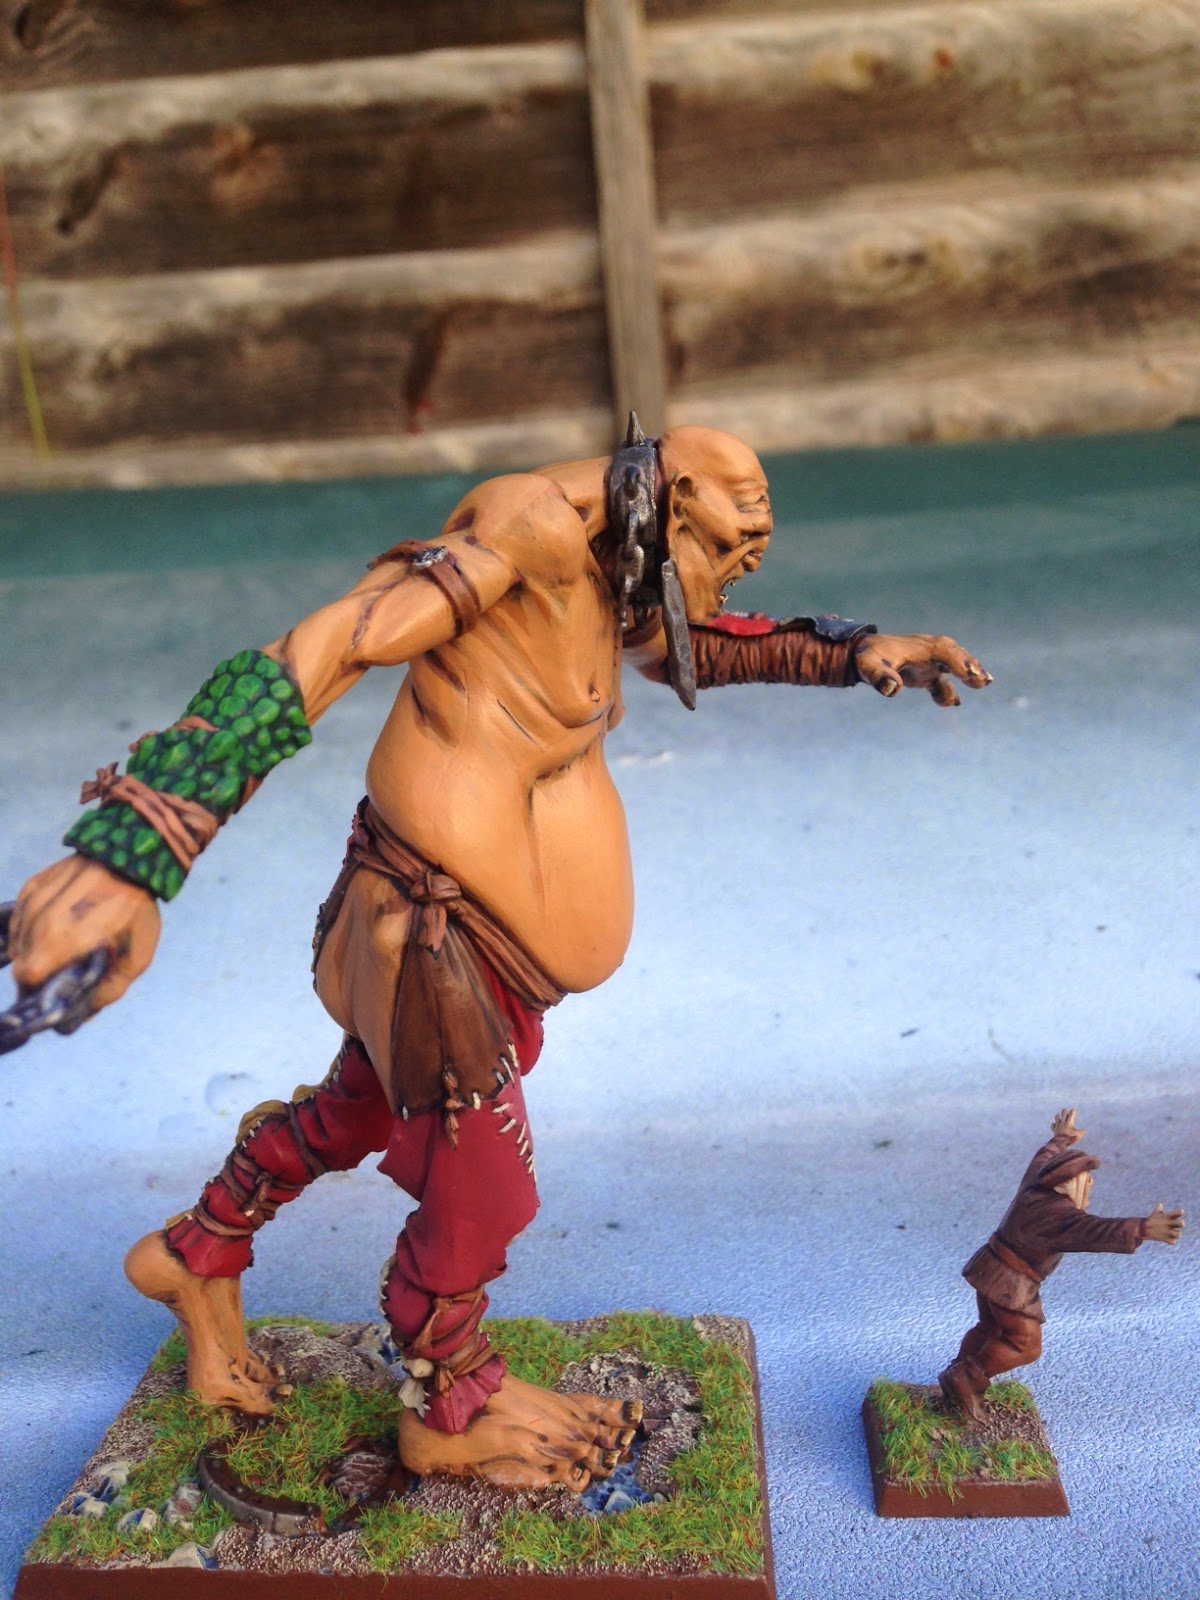
This is the  model that comes with the Warhammer Giant. I painted him for 2 reason, the first was to how fast I could paint a model from start to finish.
So from clipping from the frame to flocking took me 23 minutes. I only timed the actual time I was painting, so the sand on the base drying and wash drying is not included. So considering who long he took I think he came out rather well. I must admit that his mainly shades of brown, which is my favorite colour to paint and the 3 brown Citadel washes are great. The whole model is base coat, wash and highlight, nice and simple.


The second reason for painting him was to add some scale to my photos. Most people reading this will know how big a standard 28mm man is. So when you see him next a monster model or any model to that matter, you should get a good idea of how big it is.


Lets see him in action...

So as you can see, the giant is... well giant really!

Oh I also finished my giant.


He took me a lot longer than I thought, but kept changing bits and used really thin paint, so had to wait to for them to fully dry before adding the next coat and in the case if the yellow, the next coat and the next and the next...

Now I should get on with my Goblins for the 19th, but really want to finish my Maggoth Lord...

So to the list of painted models this year I can add Fleeing Fred and the Giant.

Thanks for stopping by and hope to see you again real soon and who knows, I might have a finished Maggoth Lord to show...

Sunday, 25 January 2015

Just a little something

I started this little chap a while ago, well I say started, what I actually mean is I stuck it together and primed it. After the big game the other day where we could have summoned a giant, but couldn't because we did have a figure I thought it was high time to get him done (well nearly).


Still needs a bit of work, but looks a lot better than the ever popular Matt black. 
Will try and get this finished tomorrow and post up the results...

Then on to finishing the 1000 points of goblins I need for my first battle at the new club...

Thanks for stopping by and hope to be back real soon.